Immunofluorescence (IF) uses antibodies and fluorescent detection to study the localization, relative expression, and activation states of target proteins in fixed cells or tissues. IF is widely used in diverse fields of study.
IF can be used to answer questions such as:
Immunofluorescence encompasses a number of related techniques that have evolved over time. All of these techniques leverage the specific recognition of biological targets by antibodies and detection of fluorescent reporters in cytometric analysis. Ensuring the biological specimen is well-preserved while target antigens are accessible to antibodies is important, but can present challenges that vary depending on the sample, the target, and the antibody.
On this page, we have compiled resources to help you navigate protocols, answer common questions, and help you design successful IF experiments.
The optimal IF technique/protocol is influenced by the type of biological material, the sample processing steps, the properties of the target antigen, and the particular antibody being used.
Considerations include:
The best antibodies yield strong, specific signal with minimal background. It’s important to chose antibodies that have been validated in the application you will be using. Antibody validation in IF can include positive and negative expression experiments (using knockout cell lines, genetic models, CRISPR or RNAi), experimental manipulation of target protein localization or post-translational modifications, and protocol optimization.
The performance of an antibody varies by application. An antibody that performs well in a western blot experiment, for example, may or may not perform in IF. During testing of new antibodies, some will exhibit minor off-target binding; these are never recommended for IF or other non-WB applications. Additionally, an antibody may perform well on frozen tissue but not FFPE tissue, or vice versa. Antibody sensitivity and performance can change depending on how the sample is fixed and processed and on antibody working conditions.
Once you have decided what type of biological samples to use in your experiment and how they will be prepared, the easiest way to browse antibodies on cellsignal.com is to first select the appropriate application. Then, you can enter search terms or select other attributes (such as host species, research area, and more) to further refine your search and select an antibody that has been validated in the application you need.
To be confident in your experimental design and results, and that your antibody is faithfully reporting its target, positive and negative control experiments can be informative. For example:
Cell Signaling Technology (CST) scientists routinely perform these types of controls as part of our validation process (see an example). It can be worthwhile to set up similar controls in your experimental model system, particularly if you are having difficulty getting the results you want.
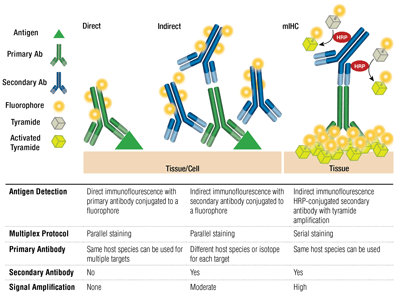
Primary antibodies provide specific recognition of the target antigen. Secondary antibodies bind to primary antibodies based on the species they were raised in. Primary antibodies that have been raised in rabbit or mouse are amenable to detection with anti-rabbit or anti-mouse secondaries, respectively.
The pairing of a primary antibody and secondary antibody (specific for the host species of the primary) that is conjugated to a fluorophore is known as indirect staining. The use of primary antibodies conjugated to fluorophores, without secondary antibodies, is known as direct staining. Direct staining methods save time and allow multiplexing using antibodies raised in the same host species. Indirect staining traditionally offers higher sensitivity thanks to signal amplification that occurs when multiple secondary antibodies bind to a single primary antibody.
Other variations on these techniques are available, such as using biotinylated primary antibodies with avidin/streptavidin-conjugated fluorochrome. Fluorophore-conjugated F(ab’)2 secondary antibody fragments (lacking the Fc domain) can help reduce background. In mIHC, horseradish peroxidase (HRP)-conjugated secondary antibodies are employed to catalyze deposition of tyramide-fluorophore conjugates.
Selecting Antibodies Fluorophores
Multiplexing employs the detection of more than 1 target at a time through multiple antibodies and detection of different wavelengths (colors) for each target. For indirect staining, the capacity for multiplexing relies on pairing of fluorophore-conjugated, species-specific secondary antibodies to each primary antibody. Mouse antibodies from distinct isotypes can also be multiplexed using isotype-specific secondaries, allowing for detection of up to 5 mouse antibodies at once. For direct staining, each primary antibody should be coupled to a different fluorophore. This allows multiple antibodies from the same species/isotype to be combined and also allows “mouse-on-mouse” staining, since nonspecific binding of anti-mouse secondaries to mouse tissue is not a concern.
When designing multiplex IF experiments, the spectral characteristics of the fluorescence microscope, including available excitation sources and filtering sets, should be taken into account to avoid spectral bleed-through. Modern epifluorescent and confocal fluorescence microscopes typically have the capability to distinguish 3 or more channels.
Cellular dyes that are applied post-fixation or fixable live-cell labels can be incorporated into an IF workflow. Organelle labeling is often used to verify subcellular localization of a target. Expressed tags, such as GFP, are often used to track transfected cells or in mosaic experiments; if the GFP fluorescence signal is low, an anti-GFP antibody can be employed in IF. Using dyes or fluorescent proteins will occupy fluorescence channels, leaving less available for antibodies.
This will depend on the spectral characteristics of the excitation source and excitation/emission filtering available to you. Evaluate the excitation and emission profile of the fluorophore before running your experiment to avoid fluorescence bleed through. CST offers a variety of fluorophore-conjugated primary and secondary antibodies, including dyes in the Alexa Fluor® line.
Tissue sections can be prepared either by quick freezing in optimal cutting temperature (OCT) medium or by fixing and embedding in paraffin. Frozen samples can be sectioned using a cryostat and allowed to air dry on the slide 10 to 15 minutes prior to fixation prior to the next step. For FFPE tissue samples, requirements for the harvesting, fixation, and paraffin-embedding steps can vary on the individual tissue type.
In general, FFPE tissue gives better morphology than OCT-embedded frozen tissue. This may make it easier to quantify positive cells or identify boundaries between stains. FFPE tissue is also very stable; once embedded, blocks of tissue can be stored for years. This type of tissue is also easier to ship between labs, and it is the preferred processing method for human pathology specimens.
On the other hand, FFPE tissue undergoes several extra processing steps that reduce the total amount of antigen due to protein degradation, require unmasking steps to detect remaining antigen, and exacerbate aldehyde-induced autofluorescence. Unless working with a very abundant protein, the remaining antigen can be difficult to detect by indirect IF and may require amplification to yield a suitable stain. It is also possible that antigen retrieval may unmask antigens that would not normally be detected and an antibody that otherwise gives the expected staining pattern may give nonspecific staining. It's equally possible to work with a target where a specific method of antigen retrieval is required to detect the target epitope. Therefore, it's important to consider how an antibody is validated and what steps are required to use it.
In the case of OCT-embedded frozen tissue, reduction of processing is prioritized over morphology. This is the quickest method to obtain immunostaining results, as slides are ready for use the moment the tissue is cut and there are fewer processing steps before embedding. There is less protein degradation and more antigen is available to bind antibody without requiring any additional, harsh retrieval steps. Because this method does not require amplification, it is more sensitive to tissue quality. Fixation type (alcohol vs aldehyde), duration (some targets such as transcription factors require a shorter fixation time), and tissue age (especially after sectioning) are all important and will vary by target. Finally, working with frozen tissue gives more flexibility in target selection, as processing can occur after sectioning allowing for greater customization in assay design.
Cells must be seeded on a support material compatible with fluorescence microscopy. Typical supports include glass-bottom cell culture dishes, glass coverslips (kept in plastic culture dishes) prepared with polylysine and/or extracellular matrix components to support adherent cell culture, and commercially available multiwell chambers mounted on glass slides that are compatible with microscopes.
Note that cell culture conditions may affect cell health, morphology, and expression/localization of your target protein and ultimately dictate the quality of your IF data. Ensure your cells are healthy by regularly checking the culture media for pH changes and inspecting for signs of cell stress (such as multinucleated cells) at low magnification on a microscope. Also check that the confluence of the cells is appropriate for the cell type and target.
The ideal fixative preserves a “life-like” snapshot while quickly stopping the degradative process of autolysis by crosslinking and inhibiting endogenous enzymes, and it presents the antigen for recognition by the antibody. Unfortunately, there is no single fixation method that performs ideally on every sample and for every antigen. Even different antigens on the same target protein can exhibit differences between protocols. This is why the best protocol can vary not only by sample type but by epitope (and antibody) as well.
For fresh-frozen tissue, sections that have been frozen and cryostat-sectioned should now be treated with fixative. Alternatively, tissue samples may be preserved by fixing first with transcardial perfusion or immersion, post-fixation, and cryo-preservation steps, followed by freezing and sectioning.
In FFPE tissue processing, tissue is preserved via immersion fixation with formalin (or other aldehyde-based fixative) or with perfusion as above, followed by paraffin embedding and sectioning. Prior to incubation with antibody, the sections must undergo deparaffinization, rehydration, and antigen retrieval steps to allow antibodies to access the sample and bind target molecules.
Rinsing the cells with warm protein-free media or PBS immediately before fixation can prevent precipitation of extracellular protein and debris. Rapid fixation is accomplished by quickly exchanging media for fixative solution.
Aldehyde-based fixatives such as formaldehyde, formalin (a mixture of dissolved formaldehyde with a lower percentage of methanol), and glutaraldehyde are most commonly used when preserving structure is paramount. For most antibodies, CST recommends fixation with 4% formaldehyde (methanol-free). Aldehydes react with and crosslink the primary amines of cellular proteins and stabilize the sample. Furthermore, cellular enzymes, including phosphatases and proteases, are deactivated by crosslinking. Aldehydes cross the plasma membrane and fix soluble proteins better than alcohols, but some targets can lose their antigenicity with aldehyde crosslinking.
Dehydrating/denaturing alcohol fixatives, such as methanol, displace water around cellular macromolecules, resulting in their denaturation and precipitation in situ. Denaturation of the target protein may expose buried epitopes, making this approach advantageous over aldehyde fixation for some antibodies. However, dehydrating fixatives are less suited for soluble targets and modification state-specific antibodies such as phospho-antibodies. Check the product datasheet for optimal fixation method.
If a crosslinking fixative is used, the plasma membrane will still be intact, making intracellular targets inaccessible to antibodies. Therefore, permeabilization should be performed after crosslinking fixation unless your antibodies recognize extracellular epitopes. The optimal permeabilization method varies depending on the antibody; always check the product page for recommended protocol.
Use of Triton® X-100 permeabilization after fixation is common. Triton and other detergents, such as NP-40, TWEEN®, Saponin, Digitonin, and DOTMAC, interact with cellular membranes to create variable “pore” sizes and allow antibody access.
Alternatively, alcohol permabilization with ethanol or methanol may be performed after the fixation step. This method combines the rapid fixation of crosslinking fixatives with intermediate protein denaturation and delipidation of the membrane. This can improve signal for certain targets, particularly those associated with organelles or the cytoskeleton.
If you are multiplexing with antibodies that call for different CST protocols, you may need to prioritize which antibody to use at its optimal conditions. An example of order optimization performed in mIHC is shown in this application note (PDF). Performing a small-scale test run comparing different protocols may be informative before scaling up your experiments.
The most common recommendation is 5% normal goat serum (or serum from the same species as the secondary antibody) in PBS + 0.3% Triton® X-100. Check the datasheet for recommended blocking agent.
If Fc receptors are present in the sample, antibody signal will come from a mix of specific target recognition (via the antigen binding site/variable region of the antibody) as well as nonspecific absorption of antibody heavy chain binding to Fc receptors. The total IgG present in animal serum blocks Fc receptors to prevent binding of primary and secondary antibodies and reduce background noise. Choosing fluorophore-conjugated F(ab’)2 fragments will also avoid Fc receptor binding for the secondary antibody (but not the primary antibody)
In other antibody-based applications, such as western blotting, blocking steps reduce the background signal caused by nonspecific, lower-affinity binding of primary and secondary antibodies to sites other than their intended target. However, we have found that recombinant rabbit monoclonal antibodies that have been rigorously tested in IF perform well on many samples with or without blocking. Ultimately, choosing quality antibodies validated in immunofluorescence goes a long way in avoiding background noise.
The signal-to-noise ratio (S/N) is related to the specificity and sensitivity of an antibody in a particular application. S/N can be calculated by comparing the “signal” of fluorescence intensities in cells that express the target of interest to the "background noise" of cells that lack expression. If the antibody is applied at too low a concentration, the fluorescence signal will be too dim to distinguish from background noise. On the other hand, an excessively high concentration will contribute to background staining, decreasing S/N. Always check the product datasheet for the recommended dilution, which is based on titrations performed during antibody validation.
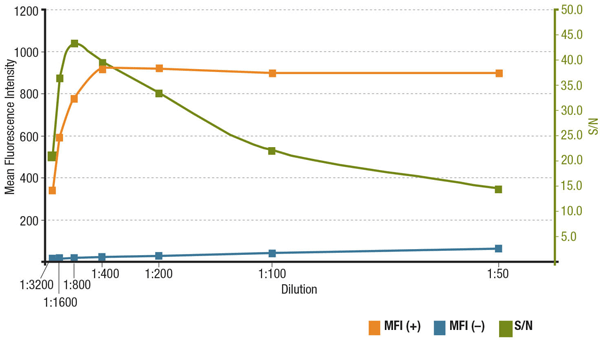
Analyis of S/N for MUC1 (D9O8K) XP® Rabbit mAb #14161 dilution. Quantitation of Mean Fluorescence Intensity in expressing (MFI(+), orange) ZR-75-1 cells and non-expressing (MFI(-), blue) HCT 116 cells, and calculated S/N (green).
In general, overnight incubations at 4°C results in strong signal. Changing incubation time and temperature can change signal and S/N. Different antibodies may respond to changed incubation conditions differently; for more, see this blog post.
IF can be performed on any fluorescence microscope with appropriate excitation source and filtering, including epifluorescent, scanning, and spinning disk confocal microscopes. Immunofluorescence is also generally compatible with specialized fluorescence techniques, including total internal reflection fluorescence (TIRF), light sheet microscopy, and some super-resolution techniques.
Any antibody approved for IF-IC can be used in high throughput screening (HCS) and high content analysis (HCA). These experiments are based on standard IF techniques, incorporating automation.
Running into problems with your IF experiment? Click here for a troubleshooting guide.
Cell Signaling Technology, CST, and XP are trademarks of Cell Signaling Technology, Inc. All other trademarks are the property of their respective owners.